How to Make an Ao Dai: A Complete Guide + Free Pattern
If you’ve been searching for a free áo dài sewing pattern or a step-by-step guide on how to sew a traditional Vietnamese áo dài at home, you’re in the right place.
In this tutorial, we’ll walk you through how to create a modern raglan-style áo dài with a back zipper and elegant 3/4 flared sleeves, designed for comfort, movement, and a flattering silhouette. This pattern is perfect whether you’re a beginner learning how to sew garments or an experienced sewist looking for a digital áo dài pattern to add to your collection.
The áo dài is a timeless and iconic Vietnamese dress, known for its fitted bodice, high collar, and flowing panels. With this printable PDF sewing pattern, you can recreate this beautiful garment at home using your own choice of fabric.

Pattern Overview: Fitted Áo Dài with Flared Sleeves
This digital áo dài PDF sewing pattern includes all the essential pieces needed to construct a traditional silhouette with a modern raglan sleeve variation.
You will be working with:
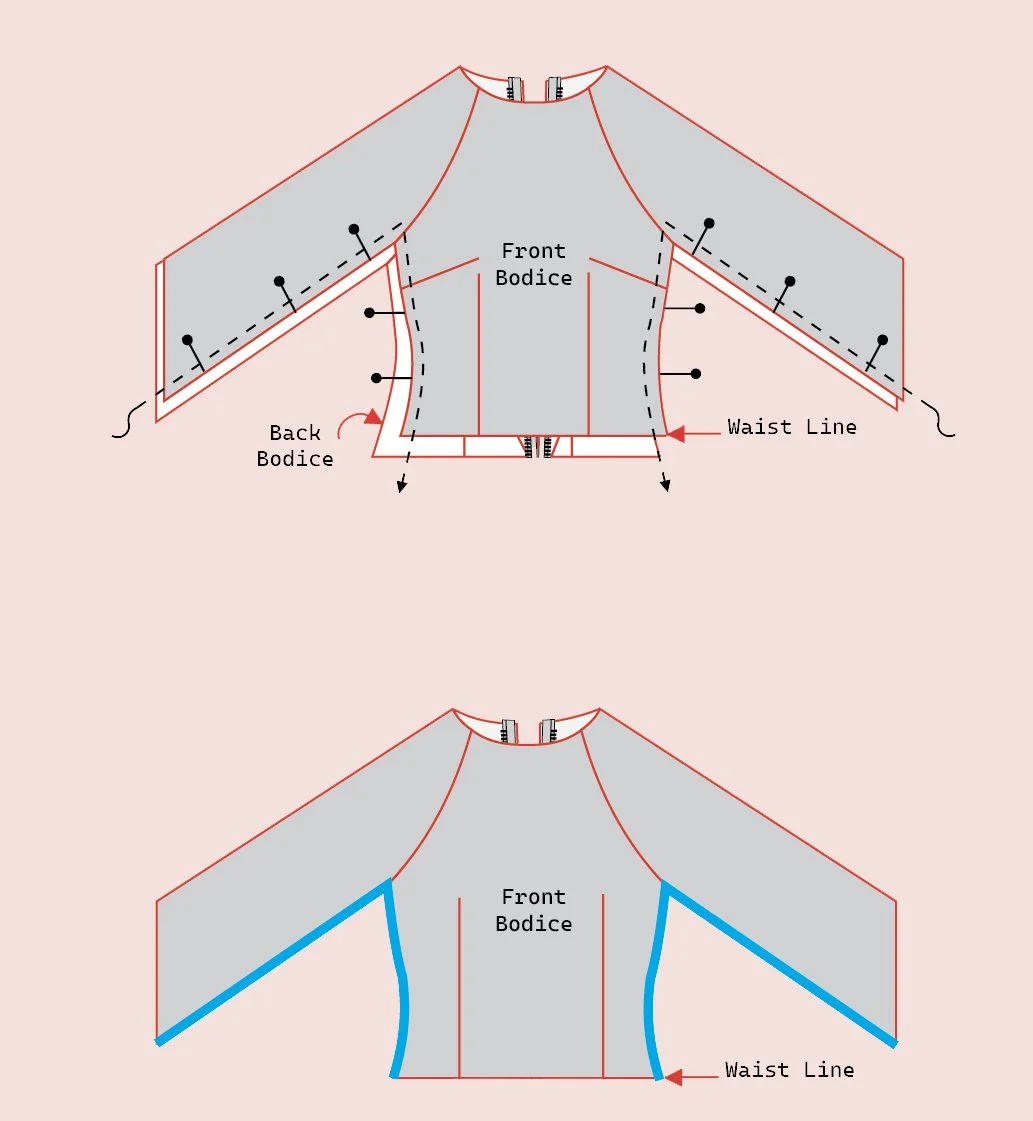
Front and back bodice pieces
Raglan sleeve sections (front and back)
Flared sleeve extensions for a soft, feminine finish
A structured mandarin collar
Optional facings or plackets depending on closure
This style is especially beginner-friendly compared to traditional fitted sleeves, making it a great starting point if you’re new to sewing áo dài garments.
Why This Pattern is Perfect for Beginners
If you’re new to garment sewing, this easy áo dài sewing tutorial is designed to guide you step-by-step through the entire process.
Raglan sleeves are easier to attach than set-in sleeves
The back zipper creates a clean, modern finish
The flared sleeve adds visual interest without complex construction
The pattern is designed for home sewing machines

Choosing the right materials is essential when working with a Vietnamese áo dài sewing pattern, especially if you want that signature soft drape and elegant movement.
Recommended Fabrics
For best results, choose lightweight fabrics such as:
Silk (traditional and luxurious)
Satin (smooth and slightly structured)
Crepe (easy to sew and beginner-friendly)
Chiffon (best with lining for layering effects)
Soft brocade (for a more formal áo dài)
Lightweight polyester blends (budget-friendly option)
You will typically need 3–4 meters of fabric, depending on your size, fabric width, and how full you want the flared sleeves and panels to be.
Taking Accurate Measurements for Your Áo Dài Pattern
Accurate measurements are key when working with a fitted áo dài sewing pattern, as the garment is designed to follow the natural curves of the body while still allowing movement.
Make sure to measure over close-fitting clothing and take note of the following:
Bust, waist, and hip circumference
Shoulder width and armhole depth
Sleeve length and arm measurements
Dress length and slit placement
Taking the time to measure carefully will ensure your custom áo dài fits beautifully and comfortably.

Before You Print
Before printing your pattern, please open the file using Adobe Acrobat Reader to ensure the layout and scaling are displayed correctly.
When printing, be sure to select 100% scale and avoid using the “fit to page” option, as this can distort the pattern size.
After printing, take a moment to verify accuracy by measuring the test square included in the file. Once the scale is confirmed, follow the provided layout diagram carefully to assemble all pages in the correct order.
How To Assemble The Pattern
Begin by printing all pattern pages at 100% scale to maintain accurate sizing. To assemble, gently fold or trim the borders and align the matching circles or markers on each page so that the pattern lines connect smoothly.
Start taping from the center pages first, then gradually work outward—this helps keep everything aligned and reduces distortion for a cleaner final layout.
Make sure to assemble your pattern on a flat, stable surface to prevent any warping or misalignment. You can use clear tape if you prefer to see the pattern lines underneath, or a glue stick if you’re working with a larger layout and want a smoother finish.
Once all pages are securely assembled, carefully cut along the lines corresponding to your selected size using sharp scissors or a rotary cutter for the most precise result.
Sewing Instructions
1. Cut the Fabrics
From your fabric, cut:
• 1 front bodice (shoulder to hem, on fold)
• 1 back bodice (shoulder to hem, on fold with centre-back seam for zipper)
• 4 collar pieces
• 4 collar interfacing pieces
• 2 flared sleeves
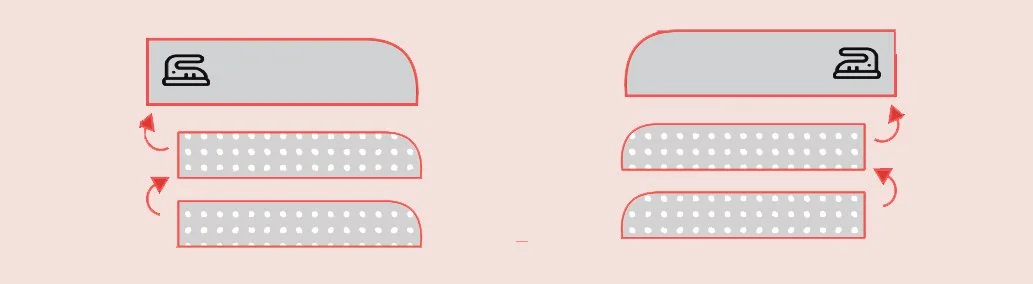
2. Pressing the Pieces
• Before beginning construction, take the time to carefully press all of your fabric pieces using an iron, ensuring that any wrinkles, folds, or creases are smoothed out, as this will help the pieces lie flat, improve accuracy when aligning seams, and ultimately make the sewing process much easier and more precise.
3. Prepare the collar interfacings
While the iron is still on, let’s prepare the collar interfacings
• Fuse 2 pieces of interfacing to the wrong side of each collar piece. You should now have 2 sturdy collar halves.
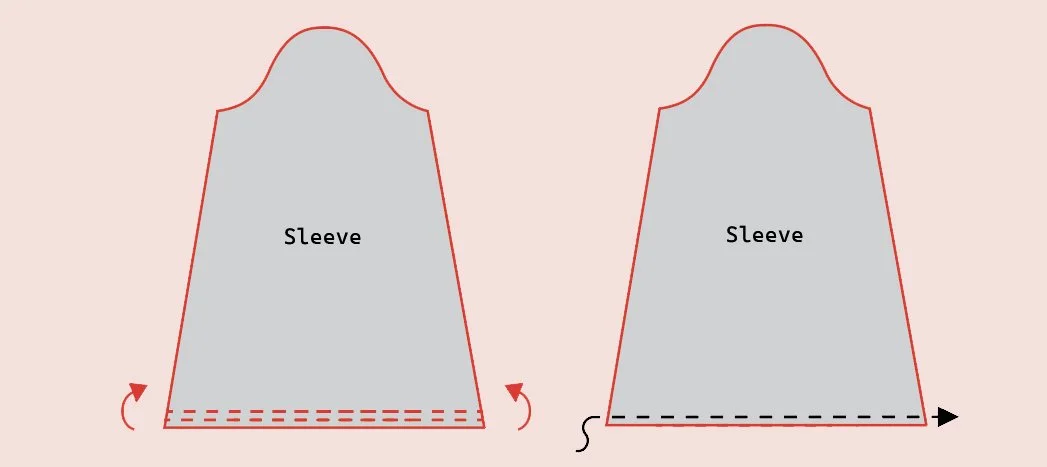
4. Prepare the Sleeve hems
• Fold the sleeve hem twice - about 1 cm each fold. Straight stich to secure. Repeat on the other sleeve.
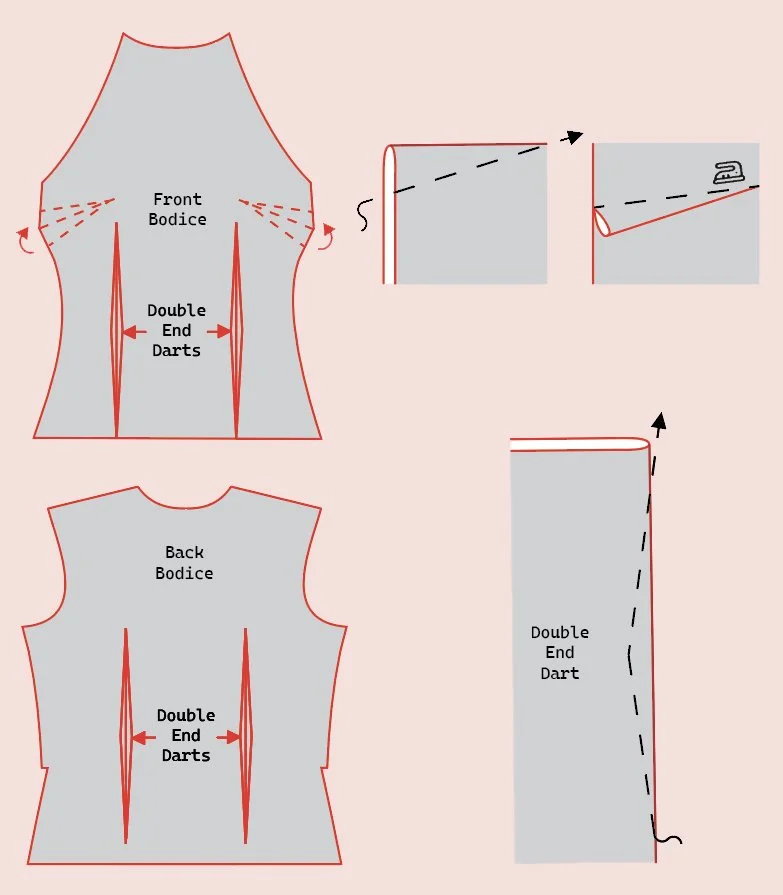
5. Sew the Bust & Waist Darts
• Sew the bust darts on the front bodice and pressing them toward the waist. Press and leave this aside for later.
• With right sides together of the front bodice, fold along the centre line of the double end dart and sew a straight stich so secure each darts. Repeat on the other side.
• For the back bodice, with right sides together, fold along the centre line of the double end dart. Sew a straight stitch to secure. Repeat for the opposite side.
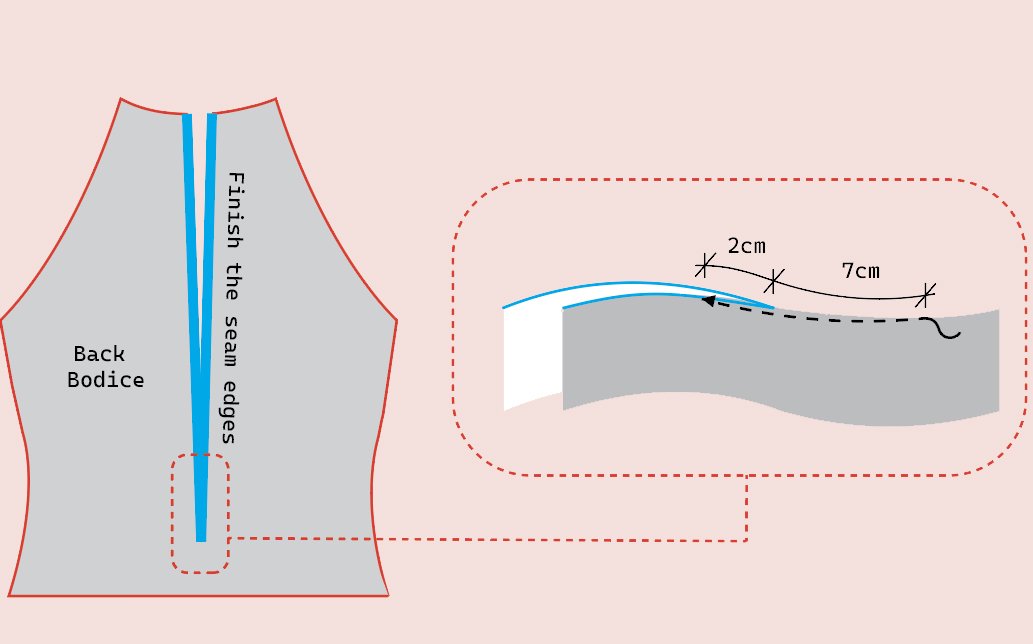
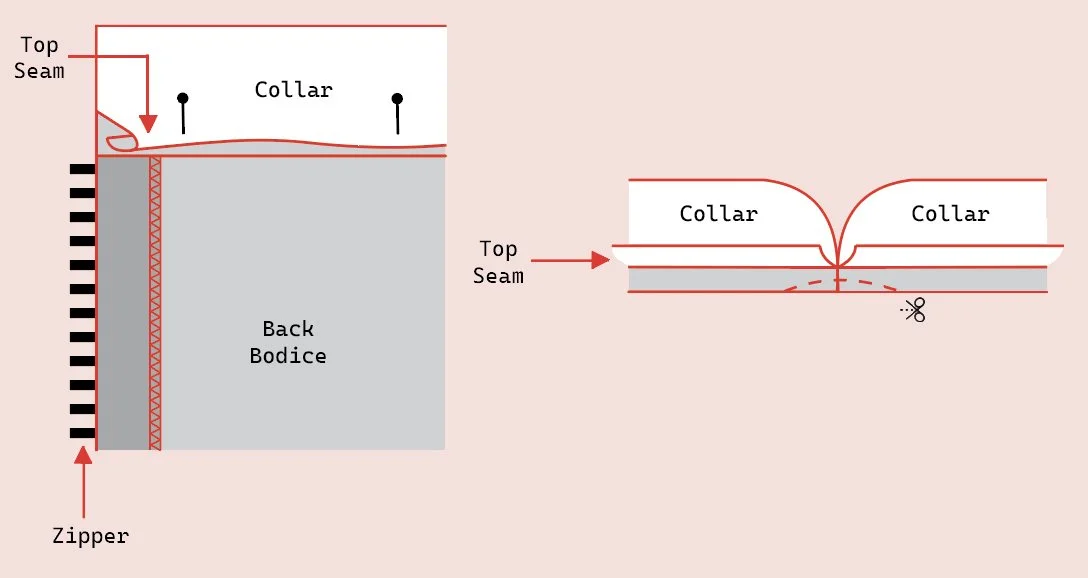
6. Insert the Invisible Zipper
• Finish the centre-back seam edges on the back bodice separately.
• Fold the centre-back seam in half, right sides together, and at the end of the back slit, Mark a line that’s 2 centimetres up from the end of the slit and 7 centimetres down — an 9 centimetres line in total.
• Straight stitch along this line to make sure the zipper ends neatly.
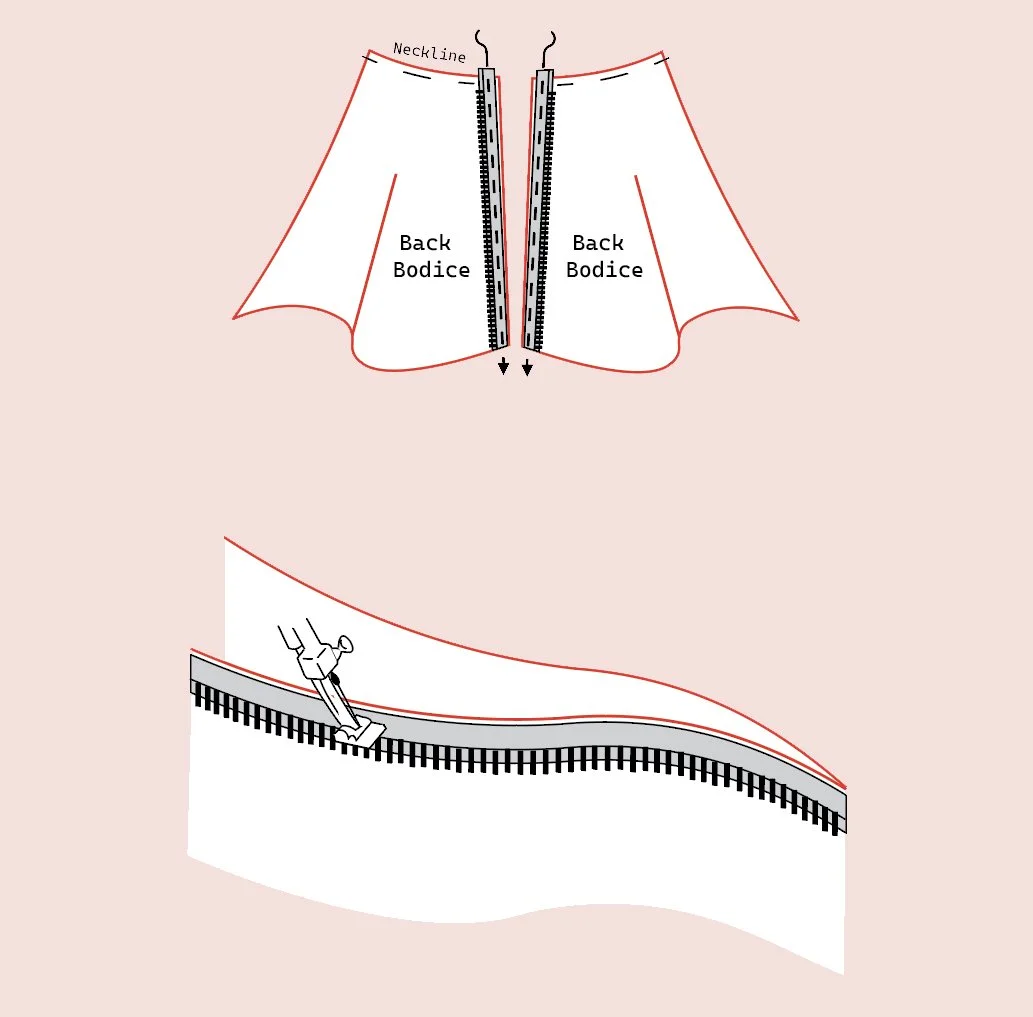
• Place the invisible zipper face down on the right side of one back edge.
• Position the plastic stopper about 6 mm below the neckline to leave space for attaching the collar later.
• Mark small matching notches along the zipper tape and the edge of the bodice slit.
• Match notches to the other side of the zipper and do the same for the other seam of the bodice.
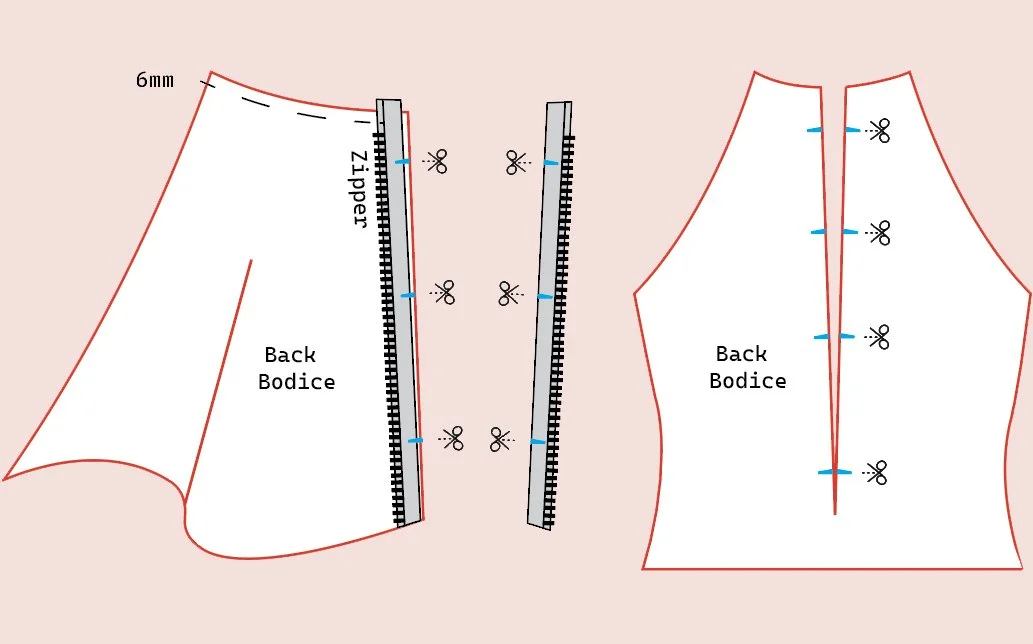
• With the zipper fully open, align right sides together, match the notches, and pin carefully. Repeat on the other side.
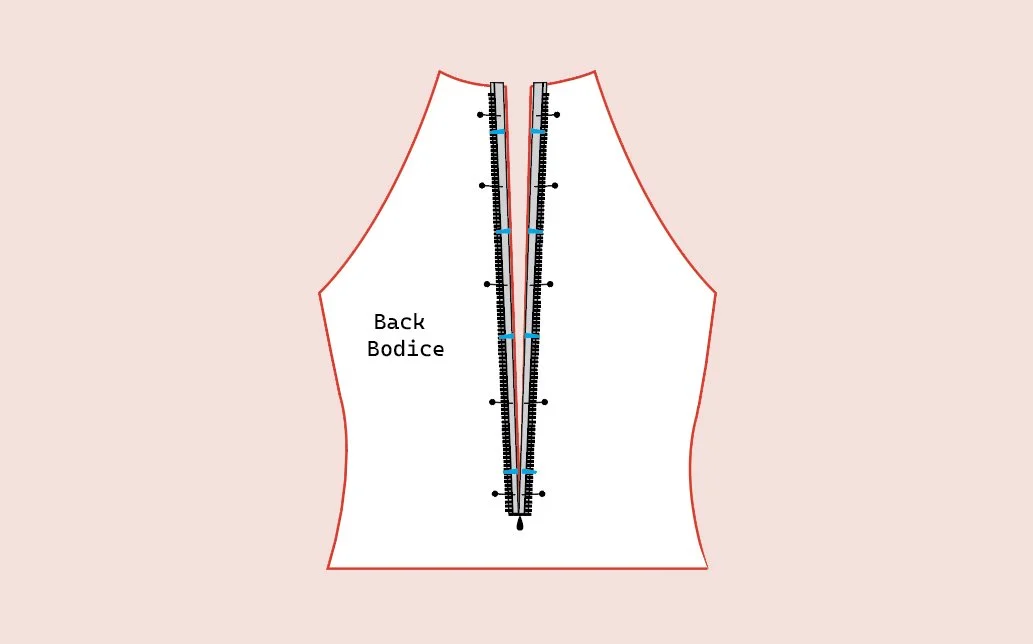
• Baste the zipper in place, then sew permanently with an invisible zipper foot.
• Stopping at the marked line as indicated in the pattern.
• Fold the zipper under the seam allowance to hide it neatly.
Tips: Make sure to use one hand to gently pull the zipper teeth away from the needle so you can stitch as close to the teeth as possible.
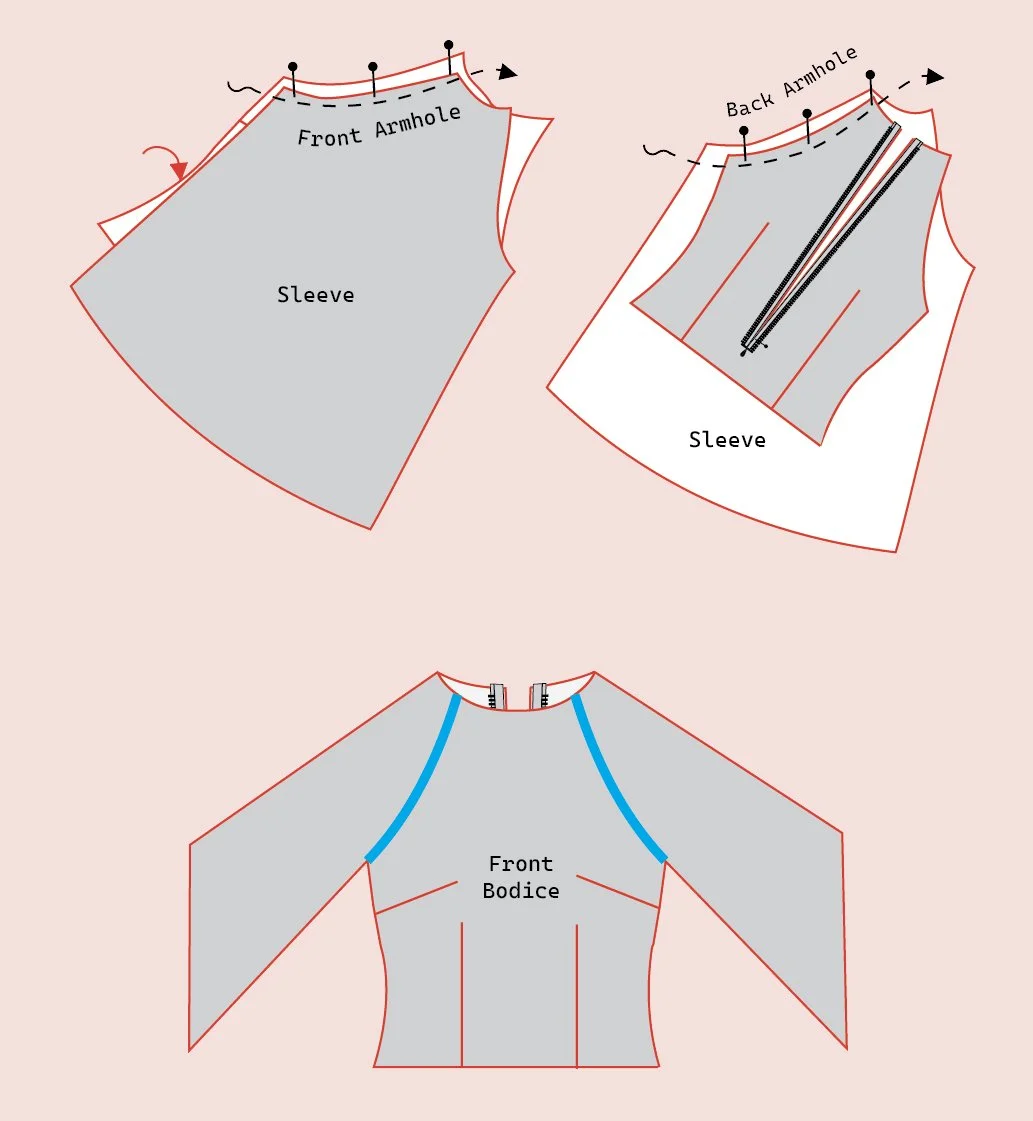
7. Attach Sleeves to Bodice
• With the right sides together, match the front armhole notch on the sleeve to the front bodice armhole.
• Pin and sew. Repeat for the other sleeve.
• Do the same with the back bodice pieces.
• Finish armhole raw edges with an overlocker, or zig-zag if you don’t have one.
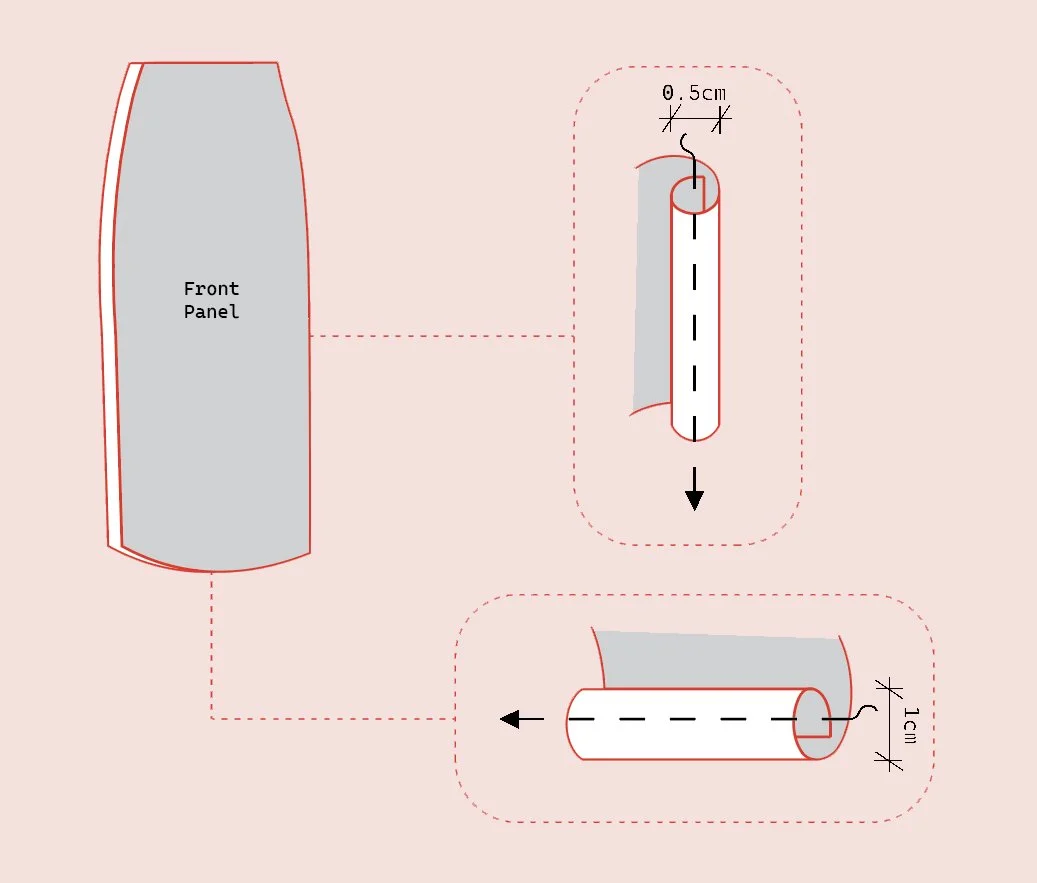
8. Sew Side Seams & Finish Áo Dài Panel Edges
• With right sides together, pin from sleeve hem down to the waist slit mark, ensuring underarms align. Stitch and backstitch securely at the slit opening.
• Overlock or zig-zag raw edges from sleeve hem to slit.
• For each slit: double-turn the edges (0.5 cm + 0.5 cm), press, and stitch neatly up to the waist slit and continue across to the other side.
• Repeat with the remaining slit.
• For the hem: double-turn (1 cm + 1 cm), press, and stitch.
9. Sew the Collar
• Place each pair of collar pieces right sides together.
• Pin in place, then stitch around the curved outer edge and square corner, sewing 2 mm away from the interfacing. DO NOT stitch the bottom edge.
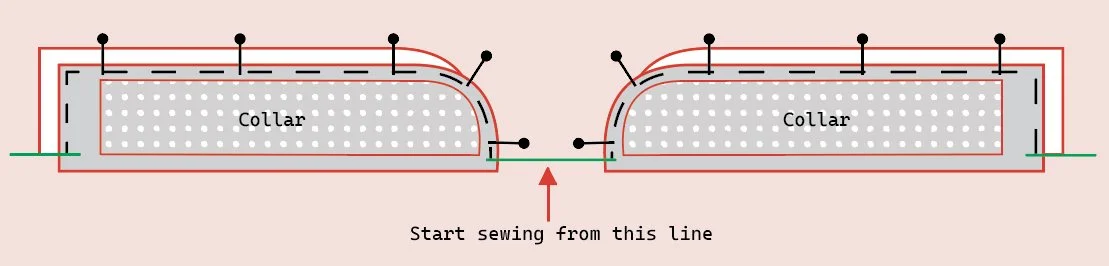
• Trim the collar seam allowance by 2mm, turn right side out, and press flat.
• Baste around the neckline edge of the bodice to keep it stable.
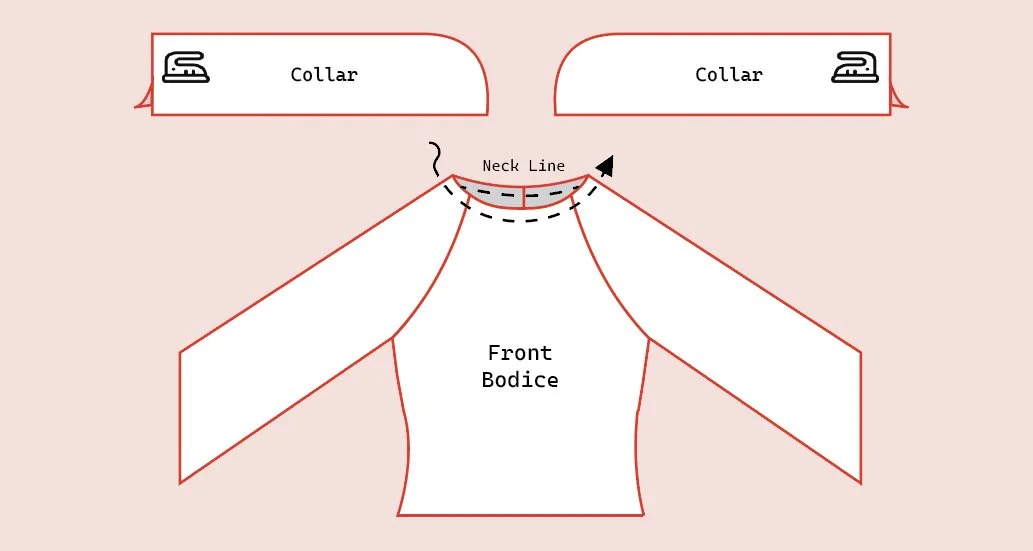
• With right sides together, pin each collar half to the neckline along the bottom seam only, starting at the centre front. Sew along the neckline, leaving the top seam of the collar free.
• At each collar end, fold the invisible zipper inward and tuck it neatly inside the collar pocket.
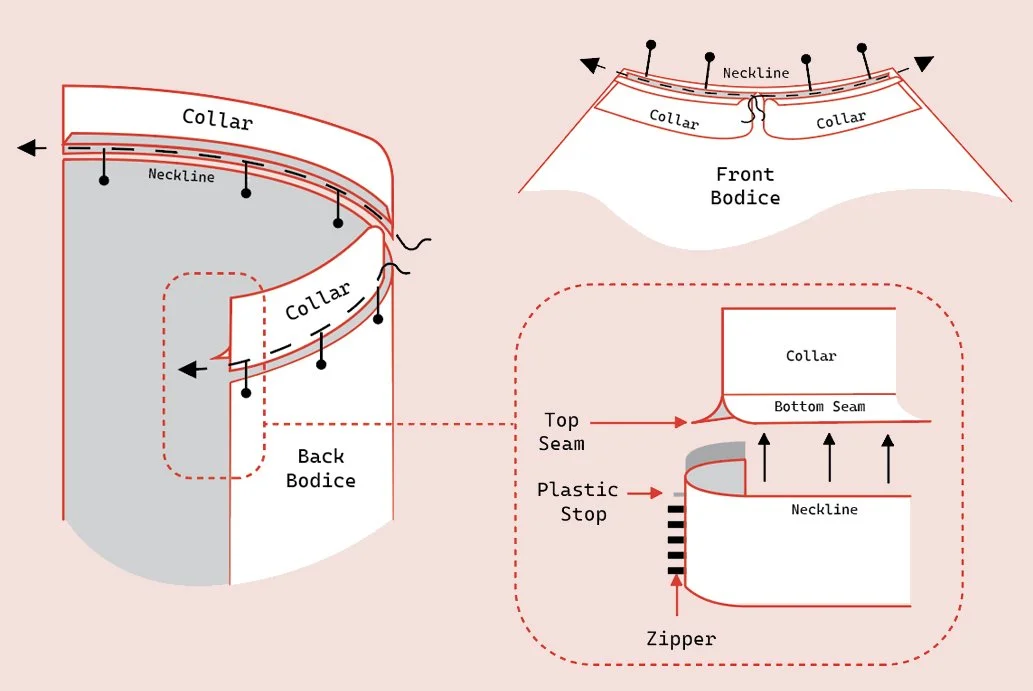
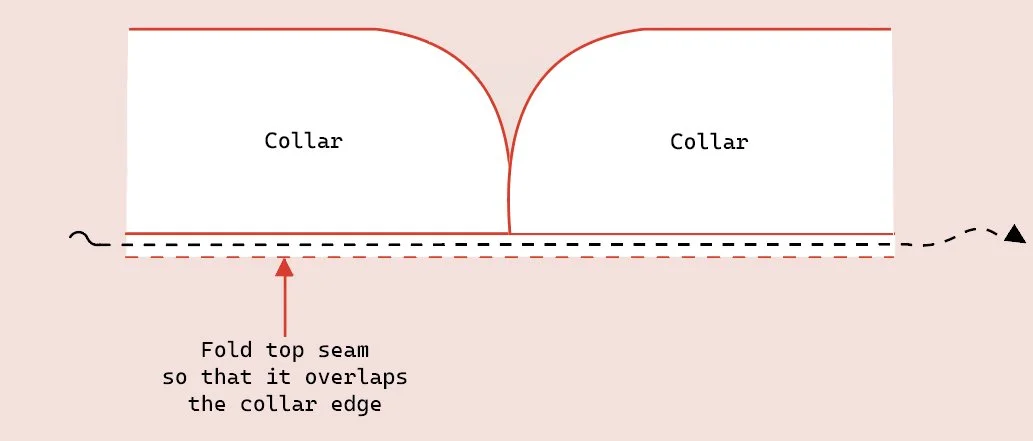
• Fold the top seam allowance inward, pin carefully so the fold overlaps the collar edge at the front. Sitch by hand or machine to secure.
• For beginners, hand stitching works beautifully. Start stitching neatly from the zipper end to the centre, then cross over to the other collar half. Take your time to keep it neat and precise.
• To make stitching easier. Take a scissor and slightly trim a small arc at the centre.
Finally, the finishing touches. Press all seams, hems, and the neckline carefully.
And there you have it — your fitted ao dai with flare sleeves is complete. Ready to wear and perfect for any special occasion
Once completed, your handmade áo dài will be a beautiful combination of tradition and personal creativity. Whether you wear it for special occasions, cultural events, or everyday elegance, this DIY áo dài sewing project is both rewarding and meaningful.