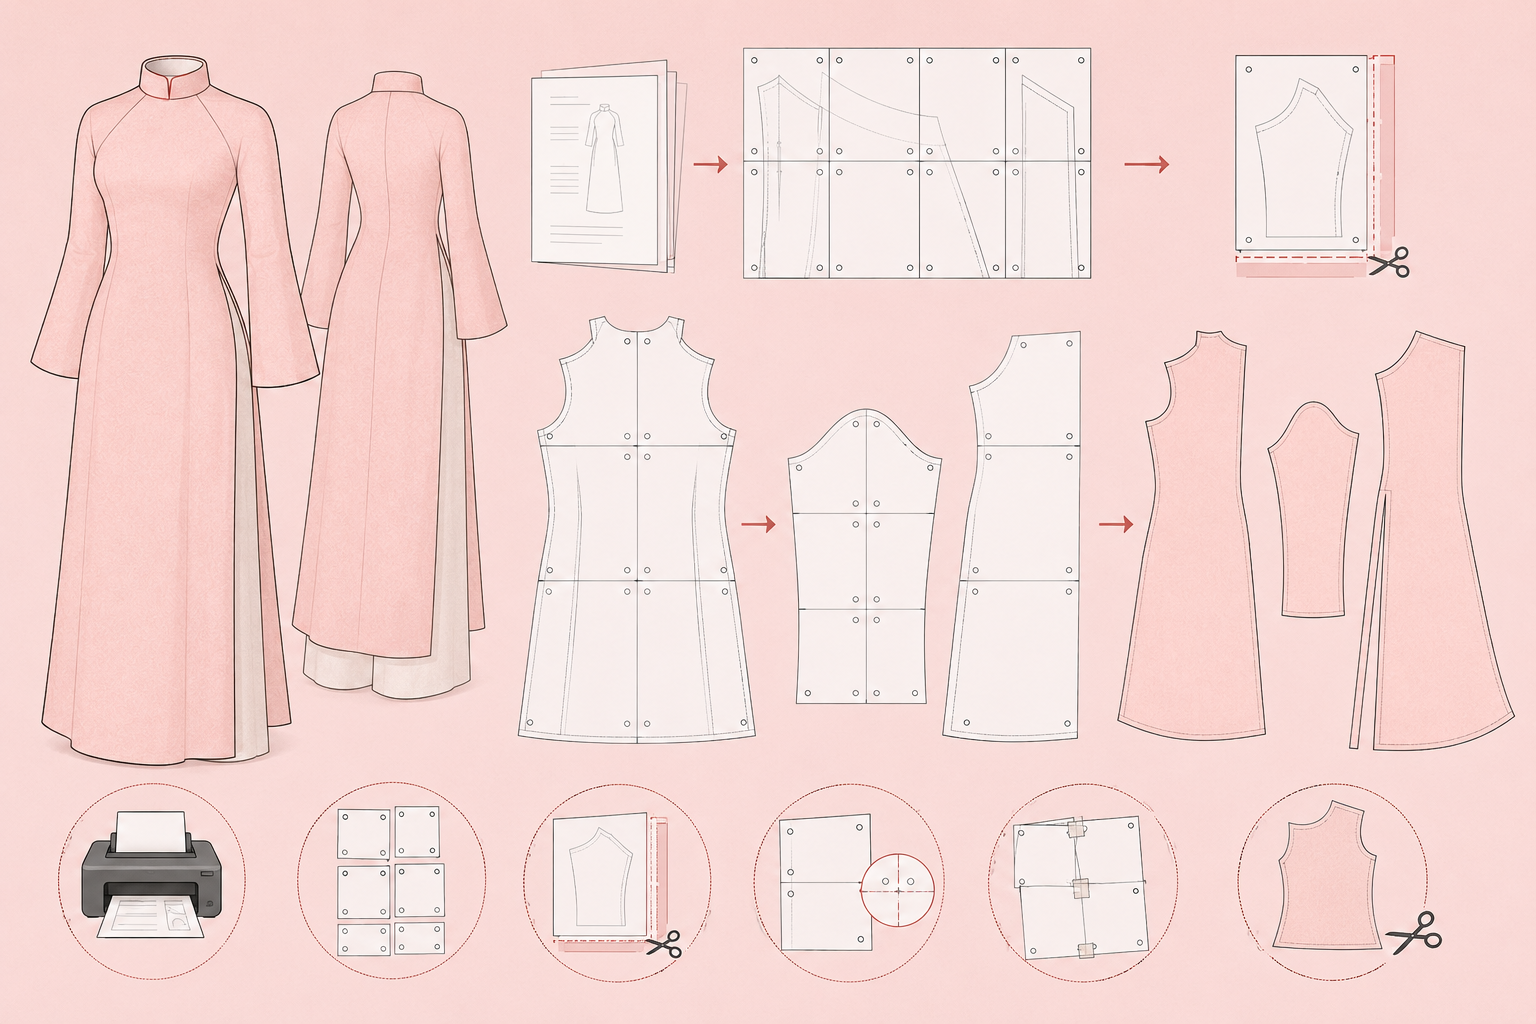
How to Assemble a Digital Sewing Pattern PDF
Digital sewing patterns are a convenient way to start sewing immediately from home. Once downloaded, your PDF sewing pattern can be printed, assembled, and cut out without waiting for shipping. If you're new to PDF patterns, this step-by-step guide will show you exactly how to assemble a digital sewing pattern correctly so your finished garment fits as intended.
What Is a Digital Sewing Pattern?
A digital sewing pattern (also called a PDF sewing pattern) is a downloadable file containing pattern pieces that can be printed at home on A4 or Letter-size paper. After printing, the pages are trimmed and taped together to create full-size pattern pieces ready for cutting fabric.
Digital patterns are popular because they are:
Instant download
Printable at home
Reusable and reprintable
Easy to store digitally
Available in multiple sizes
Whether you're sewing an áo dài, dress, blouse, skirt, or pair of pants, the assembly process is generally the same.
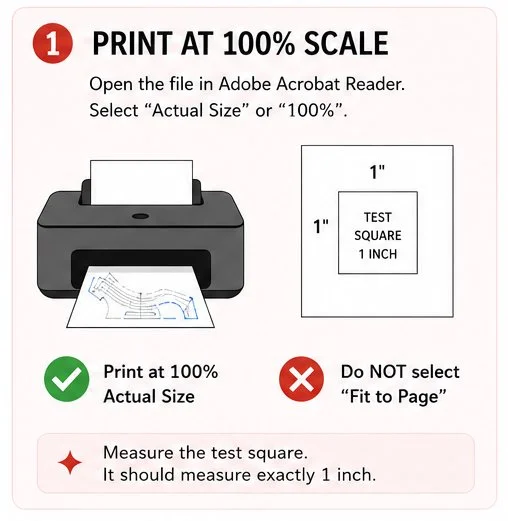
Step 1: Print at 100% Scale
After purchasing or downloading your pattern, save the PDF file to your computer.
Before printing:
Open the pattern using Adobe Acrobat Reader or another PDF viewer.
Locate the test square page.
Check whether your pattern includes layers, A4 pages, Letter pages, or A0 copy-shop files.
Correct printing scale is essential for accurate sizing.
When printing your sewing pattern PDF:
Select Actual Size or 100% Scale.
Do not select Fit to Page, Shrink Oversized Pages, or Scale to Fit.
Print the test square first.
Many pattern designers include a 1-inch or 5 cm test square. Measure this square carefully using a ruler.
If the test square measures correctly, you can print the remaining pages.
Why Printing at 100% Matters
A pattern printed at 95% or 105% can significantly affect garment fit. Even a small scaling error can alter seam lengths, bodice measurements, and sleeve dimensions.
For best results, always print your PDF sewing pattern at actual size.
After purchasing or downloading your pattern, save the PDF file to your computer.
Before printing:
Open the pattern using Adobe Acrobat Reader or another PDF viewer.
Locate the test square page.
Check whether your pattern includes layers, A4 pages, Letter pages, or A0 copy-shop files.
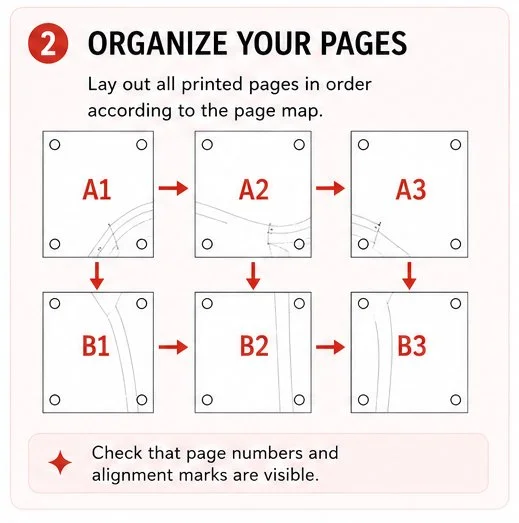
Step 2: Organize Your Pattern Pages
Lay out all printed pages in numerical order.
Most digital sewing patterns include:
Page numbers
Alignment diamonds
Alignment circles
Matching triangles
Grid lines
These markers help ensure every page is positioned correctly before taping.
Taking a few minutes to organize pages first will make assembly much faster.
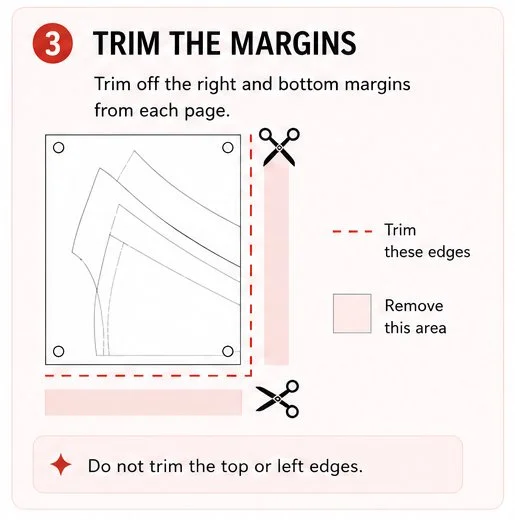
Step 3: Trim the Margins
Using paper scissors or a rotary cutter, trim the margins from the designated sides of each page.
Most PDF patterns require trimming:
Right edge
Bottom edge
Leave the opposite sides intact so pages can overlap accurately.
The pattern instructions will usually indicate exactly which margins should be removed.
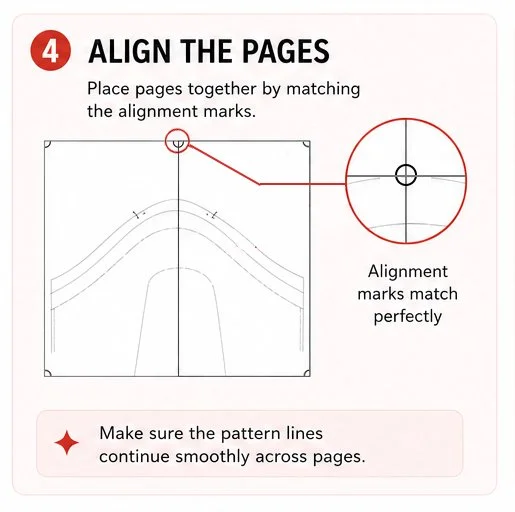
Step 4: Match the Alignment Marks
Place adjacent pages together by matching the alignment markers.
Look for:
Diamonds
Circles
Triangles
Crosshairs
Grid intersections
The printed pattern lines should continue smoothly from one page to the next.
Take your time during this stage. Accurate alignment ensures your sewing pattern pieces maintain their intended shape and measurements.
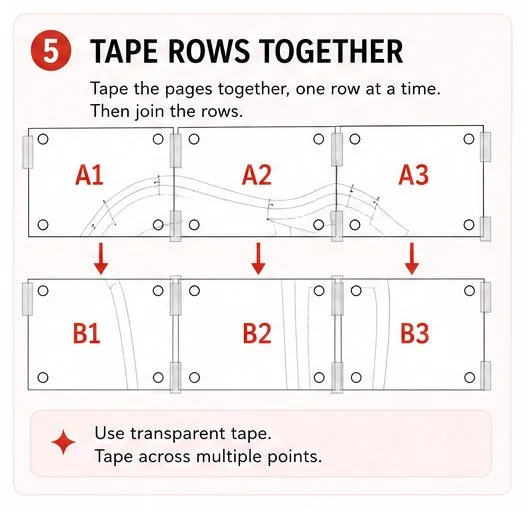
Step 5: Tape the Pages Together
Once the alignment marks match:
Tape pages together one row at a time.
Use transparent tape for visibility.
Tape across multiple points to prevent shifting.
Continue until each row is complete.
Many sewists find it easiest to assemble horizontal rows first before joining the rows together.
After each row has been taped:
Match the row alignment markers.
Check that pattern lines continue smoothly.
Tape the rows together.
At this stage, you should see the complete pattern piece taking shape.
Large pieces such as skirts, dresses, and áo dài panels may span many pages, so double-check alignment before permanently taping.
Pro Tip
Place a small piece of tape at each alignment point before fully taping the seam. This helps keep pages from moving while assembling larger pattern pieces.
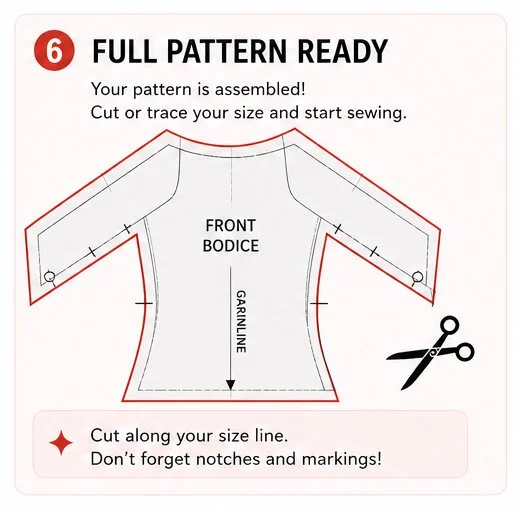
Step 6: Select Your Pattern Size & Cut Out the Pattern Pieces
Many modern PDF sewing patterns include multiple sizes nested together.
Before cutting:
Review the size chart.
Identify your chosen size.
Highlight the cutting line if desired.
Some sewists prefer to trace their size onto pattern paper so the original PDF pattern can be reused later.
Carefully cut along your selected size line.
Be sure to preserve:
Notches
Grainlines
Fold lines
Placement markings
Button and zipper markings
These details are important during fabric cutting and garment construction.
Common PDF Pattern Printing Mistakes
Printing at the Wrong Scale
Always print at 100% scale or Actual Size.
Ignoring the Test Square
Measure the test square before printing the full pattern.
Trimming the Wrong Margins
Check the pattern instructions carefully before cutting page edges.
Misaligned Pages
Even slight misalignment can affect fit and seam matching.
Cutting Before Checking Size
Verify your measurements against the pattern size chart before cutting.
Benefits of PDF Sewing Patterns
Digital sewing patterns offer several advantages over traditional paper patterns:
Instant access after purchase
No shipping costs
Easy pattern storage
Unlimited reprinting
Multiple size options
Eco-friendly printing choices
For many home sewists, PDF sewing patterns have become the preferred way to access modern sewing patterns and independent pattern designers.
Final Thoughts
Learning how to assemble a digital sewing pattern is a simple skill that quickly becomes second nature. By printing your PDF sewing pattern at 100% scale, matching alignment marks carefully, and taping pages accurately, you'll create a full-size sewing pattern ready for cutting and sewing.