How to Sew an Áo Dài Collar
The collar is one of the most distinctive features of the áo dài. Its elegant standing shape frames the neckline beautifully and gives the garment its signature refined appearance. A well-made collar should sit smoothly against the neck, maintain its structure, and finish neatly at the centre front and zipper opening.
In this tutorial, you’ll learn how to construct and attach an áo dài collar step by step for a clean, professional result.

Why the Collar Matters
The áo dài collar is more than just a neckline finish — it defines the overall elegance of the garment. Because the collar sits close to the neck and is highly visible, careful construction is essential.
A properly sewn collar should:
Sit evenly around the neckline
Maintain a smooth curved shape
Have crisp corners and clean edges
Align neatly with the zipper opening
Tools and Materials
Before you begin, prepare the following:
Collar fabric pieces
Fusible interfacing
Matching thread
Sewing machine
Pins or clips
Fabric scissors
Iron
Hand sewing needle (optional)

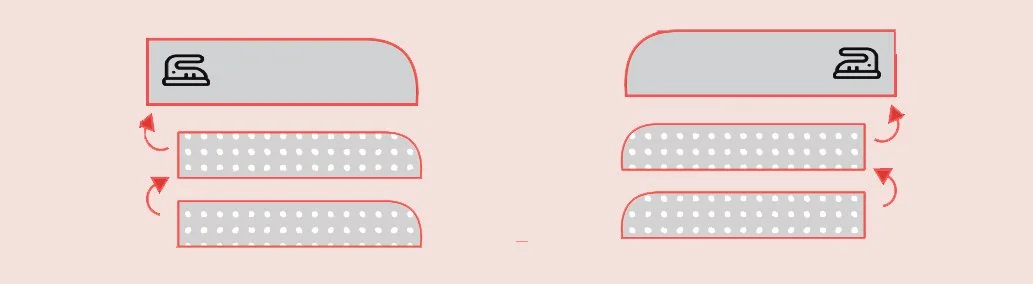
Step 1: Construct the Collar
Fuse 2 interfacing pieces to the wrong side of 2 collar pieces, creating 2 reinforced collar halves.
Press again to ensure the interfacing is fully bonded
Begin by placing each collar pair right sides together. Make sure the interfaced side is properly aligned to help the collar maintain its structure.
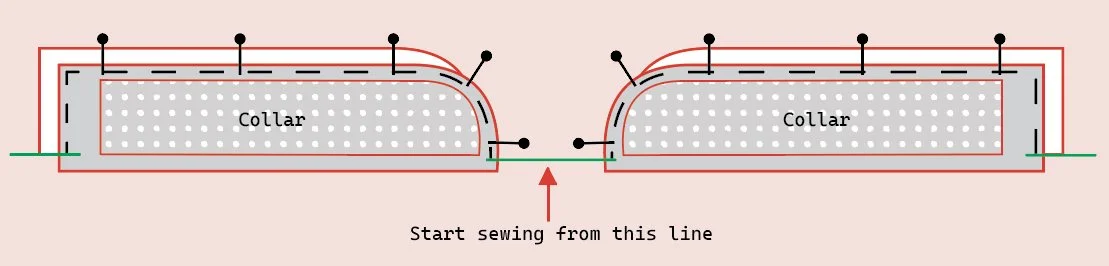
Sew the Collar
Stitch along:
The curved outer edge
The square collar corner
When sewing, stitch approximately 2 mm outside the interfacing edge. This creates a slightly softer roll and prevents the interfacing from creating a rigid outline on the finished collar.
Leave the bottom edge open, as this section will later attach to the neckline.
Step 2: Trim and Turn the Collar
After stitching:
Trim down the seam allowances to reduce bulk
Carefully clip curves if needed
Trim the collar corners diagonally without cutting through the stitches
Turn the collar right side out using a point turner or blunt tool to sharpen the corners gently.
Press the collar flat with an iron, shaping the curved edge carefully for a smooth finish.
Step 3: Stabilise the Neckline
Before attaching the collar, baste around the neckline of the bodice.
This temporary stitching helps:
Prevent stretching
Keep the neckline stable
Ensure the collar sits evenly once attached
This step is especially important when working with delicate fabrics commonly used for áo dài such as silk, satin, or chiffon.
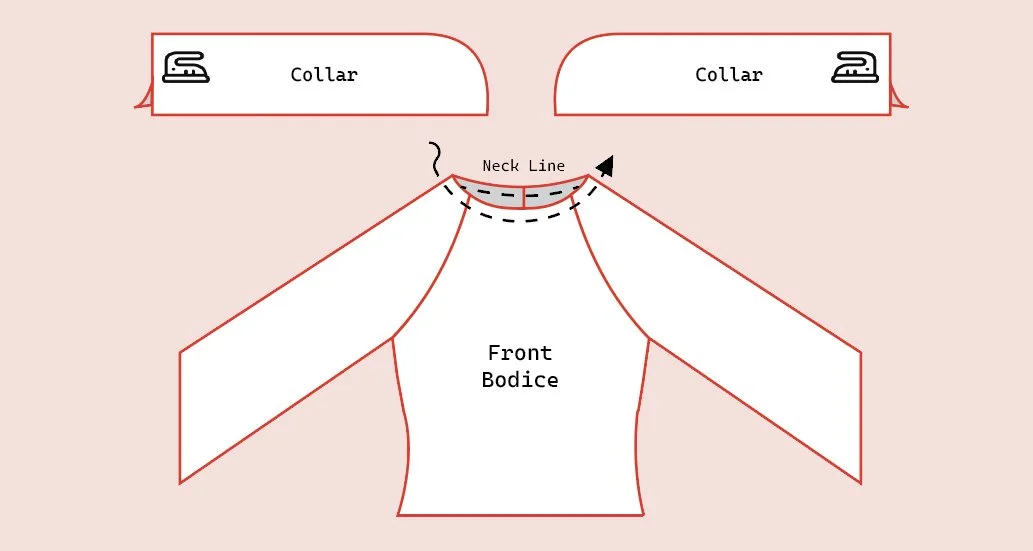
Step 4: Attach the Collar
With right sides together, pin each collar half to the neckline.
Start pinning from the centre front and work outward evenly toward the back opening. Matching the centre front first helps maintain symmetry.
Carefully align:
Neckline edges
Collar seams
Centre front points
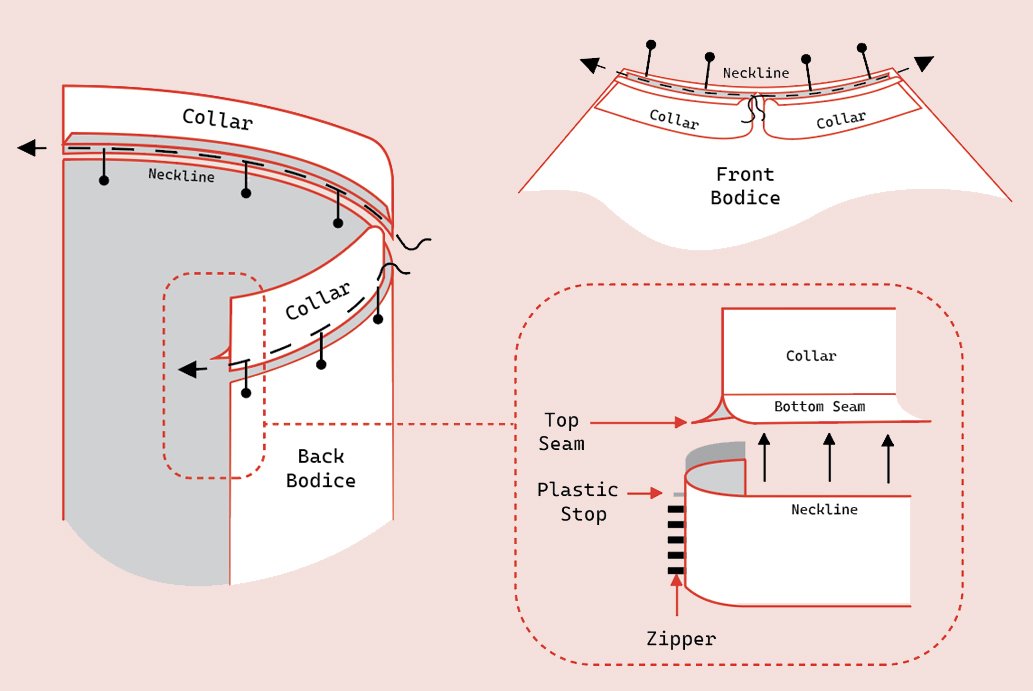
Stitch along the neckline while leaving the top edge of the collar free.
Step 5: Finish the Collar Ends
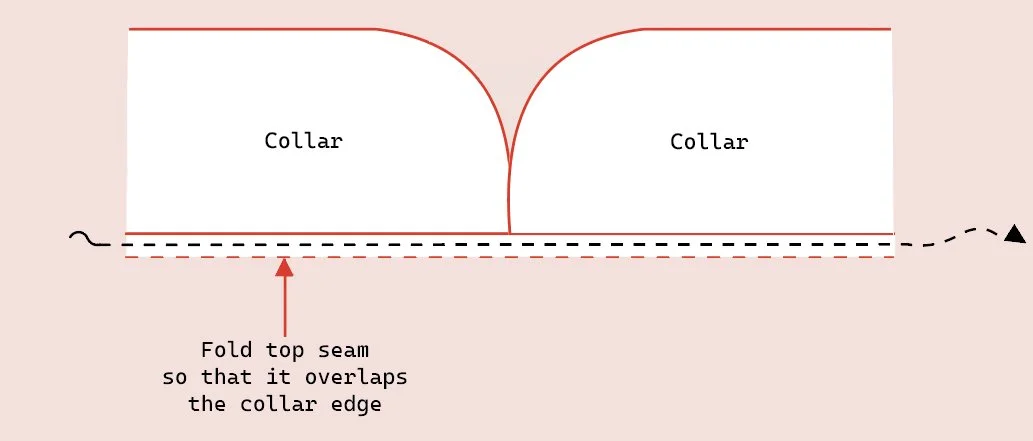
At the collar ends near the zipper opening - fold the raw edges inward
Fold the seam allowance neatly inside the collar. Carefully tuck the zipper ends into the collar opening so they are hidden cleanly inside.
Pin the folded collar edge so it fully covers the inside collar seam underneath.
This creates a neat and professional finish around the zipper area.
Step 6: Turn and Topstitch
Turn the collar right side out and check that:
Both collar ends are even
The neckline sits smoothly
The zipper area looks clean and balanced
Press the collar carefully before topstitching.
Topstitch along the neckline:
Starting from one zipper end
Across the centre front
Continuing to the opposite side
Use even stitching and sew slowly around curves for the cleanest result.

Tips for a Professional Áo Dài Collar
Use lightweight interfacing to avoid stiffness
Press after every major sewing step
Grade seam allowances to reduce bulk
Clip curves carefully for a smoother neckline
Hand baste difficult sections before machine stitching
Use a tailor’s ham when pressing curved collar areas
Final Thoughts
A beautifully sewn collar elevates the entire áo dài and gives the garment its timeless elegance. Although collar construction requires patience and precision, taking the time to shape, press, and finish each step carefully will result in a polished, professional look.
Once mastered, this technique will become one of the most rewarding parts of áo dài construction.